Showing posts with label Blog tutorial. Show all posts

Back to Basics Blog Design Tutorial (4) Domain Name

So you have been using blogger for some time now and decide to get your own domain. The easiest way to do this is to purchase your domain name from Google. Our partner blogshop Little Red Reading Nook has its own domain i.e. littleredreadingnook.com (previously littleredreadingnook.blogspot.com)

The cost of hosting your domain per year is USD$10.00. 

Go to SETTINGS and then choose PUBLISHING.


Now, click on CUSTOM DOMAIN. You will see this next screen:


You will be be prompted to BUY A DOMAIN FOR YOUR BLOG
Check the domain name availability first. If the name is available, you can then buy it. You have a choice of registering your domain name under eNom or Godaddy.com. 

Once you have completed your registration of your domain name, please wait for approx 2-3 days for your blog's info/DNS settings to be updated automatically. 

Then, go to SETTINGS & PUBLISHING again. Select 'Custom Domain'


Then select 'Switch to advanced settings'


You will then need to key in your new domain URL. Your readers will not be left behind - those who key in your old blogspot URL will be redirected to your new domain.

Back to Basics Blog Design Tutorial (3) Removing the borders around the Header

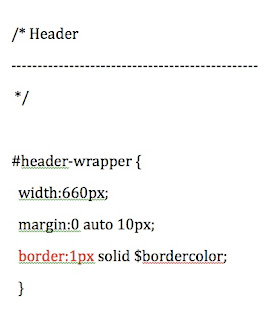
This is another simple tutorial on how to remove the borders around your blog header. This is especially good if you are uploading your own header. Just go to LAYOUT, and EDIT HTML. Scroll down to find this portion of the html code which contains the information pertaining to your blog's header and header-wrapper.


Edit the border:1px to 0px. Then the solid border around your blog header will disappear. If you want the borders to be more visible, just increase the 1px to 10px etc. You can also change the borders from solid to dotted or dashed. Go experiment! Remember to save a copy of your blog template before editing it.

Back to Basics Blog Design Tutorial (1) Adjust your Widgets

I will be blogging about some very basic blog design tips in a series of blog posts.

This tutorial is about adjusting the size of your sidebar widgets in blogger.
Examples of widgets are : Feedjit blog traffic, Link buttons, adverts etc. All these can be adjusted accordingly to fit into your blog's sidebar.

Here is the html code for Huiwearn Kids Store badge or link button:


As you can see, the portion of the code that specifies the reference URL is highlighted in green
The next portion of the code specifies the characteristics or details pertaining to the image.
First is the border highlighted in orange which is "0" or NONE.
Next you will see the portion of the code which is the URL for the image source highlighted in purple.

The actual size of the image is the same size as the image that was uploaded to photobucket. 

So, if you would like to adjust the size of the image, just add these details into the html codes :
width="x"
height="y"
x and y = a number in pixels.

This is what the new html code would look like :